One of my technological obsessions is thin client computing. I absolutely love taking one powerful computer and making it usable by multiple users on less powerful computers or devices. Whether those users are physically near that computer, or thousands of miles away. I think this type of solution is underutilized in schools, small businesses, non-profit organizations, and even homes. It upsets me when I think about a school struggling to put computers in front of students due to a limited budget. I fear that too many of them don’t have an understanding that there is a much more affordable approach. My goal for this post is to show you how I have implemented this type of solution in my home and to provide you with information on how you can implement it into your own home or office.
In this post I am going to present to you how to take one computer running Microsoft Windows and share it with multiple users. Each user will have their own desktop that can be used while other users are also using the system simultaneously, without interference. Each user will be connecting to the server (the computer running Windows) with a Raspberry Pi being used as a thin client.
Disclaimer
The steps in this post were how I was able to accomplish the task of setting up a Raspberry Pi Windows RDP Thin Client. There are hundreds of different ways that this task could have been achieved, but this is the approach that I took. I make no claims of being an expert in any of the topics that I present to you. In most cases, I present what I have learned as I learn it. With that said, it is my hope that this post will be useful to you and help you to successfully deploy this type of solution in your own environment.
- What You Will Need
- Server Setup
- Thin Client Setup
What You Will Need
- Raspberry Pi
- To use as our thin client. You will need to have it connected to its own monitor, mouse, and keyboard. This post also assumes you will be connecting it to your network via Ethernet.
- You can use any Pi you wish, but I am using a Raspberry Pi 3.
- You can use almost anything as a thin client. However, the goal of this post is to discuss how to turn a Raspberry Pi into a thin client. I used a Raspberry Pi 3 for a few reasons:
- In my experience, the more processing power a computer has, the better my RDP session is going to be.
- For the sake of convenience. Having four USB ports onboard is much more convenient than having to attach a USB hub.
- I wanted to be able to allocate additional RAM (random access memory) to the GPU (graphics processing unit) of the Raspberry Pi. Since the Pi 3 has 1 GB of RAM onboard, I figured I could do a 50/50 memory split. 512 MB (megabytes) to RAM and 512 MB to the GPU. While I think it would theoretically be possible to give additional memory to the GPU, I have not experimented beyond this 50/50 split.
- 8 GB microSD Card (or larger) flashed with the Secure Baseline Setup Image.
- Gigabit Ethernet USB Adapter
- This is optional, but for increased performance I HIGHLY recommend it.
- I have had good success with this Anker USB 3.0 Portable Gigabit Ethernet Adapter.
- A Microsoft Windows “server.”
- This is what our thin clients will connect to.
- This can be a regular desktop computer, laptop, or virtual machine. I use the term server because it will be serving the desktop to the thin clients.
- Any computer with Windows Vista or above should do just fine. The computer I am using runs Windows 10 so keep that in mind if you are using something different.
- RDP Wrapper will need to be installed onto the computer we use as the server. This enables multiple simultaneous RDP sessions.
- Unfortunately, RDP Wrapper does not work on Microsoft Hyper-V virtual machines with RemoteFX enabled. This is HIGHLY unfortunate.
Server Setup
As stated earlier, this should be a Microsoft Windows computer running Windows Vista or later. In this section we will make changes to the server that will make it easier for our thin clients to connect to it. We will also make changes to the server that will hopefully increase its performance.
Change Hostname
While we will primarily be using the IP address to connect to our server, for organizational reasons it’s still good to name a computer to its relevant purpose.
From the Cortana search, look for system and click on the System Control Panel item.

Click on Advanced system settings
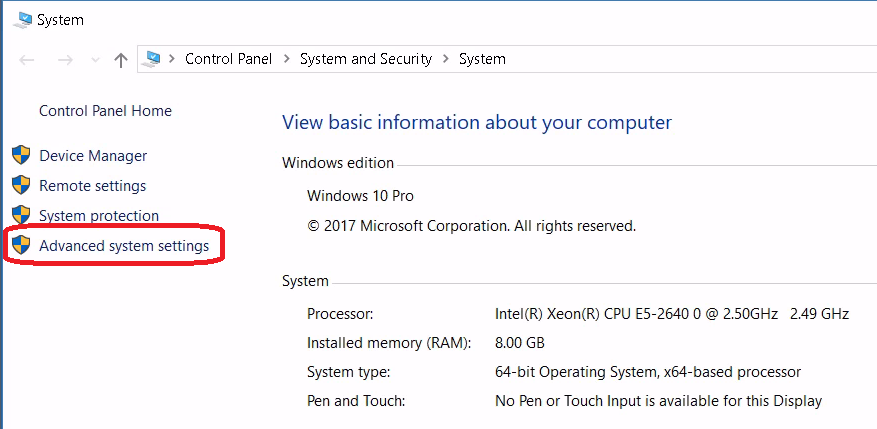
Enter a unique name into the Computer name field. This is your chance to be creative! I used “RPI-TC-SVR” to symbolize “Raspberry Pi Thin Client Server.” Additionally, I would recommend putting the name of your Workgroup into the Workgroup field. If you do not have one, now is your chance to create one. I used “RPITCN” to symbolize “Raspberry Pi Thin Client Network.”

Setup Remote Access
Once you have entered the new computer name and workgroup. You can click on OK.
Click on the Remote tab.
Ensure that Allow remote connections to this computer is selected and uncheck Allow connections only from computers running Remote Desktop with Network Level Authentication (recommended). We do this because the RDP client we will be using on the Pi does not provide this capability.
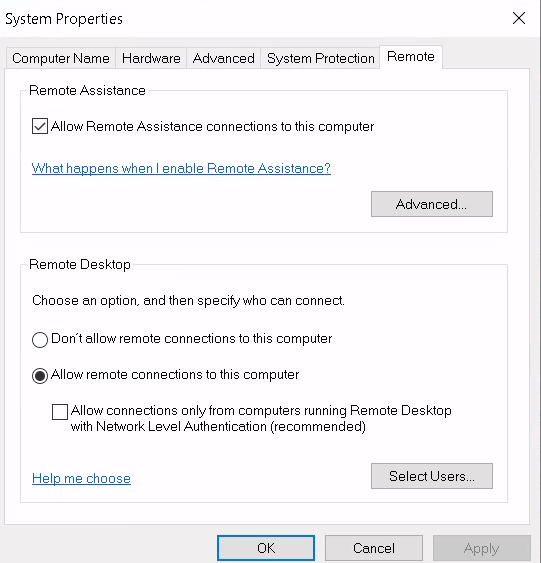
Click on Select Users.
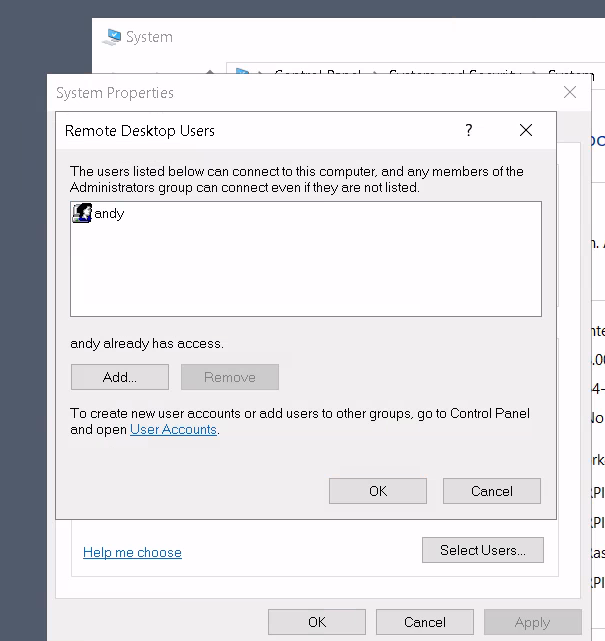
Ensure all users who will need remote access have been granted access. Click on Add to add additional users.
You can close all of the screens now by selecting OK.
Static IP Address
We are now going to set a static host name. This is even more important than changing the hostname because we are going to hard code the IP address of our server into our thin client’s connection file.
If you liked my method of using IP address reservation on your router from the Raspberry Pi Secure Baseline Setup Image article, you can apply the same principle’s here. You’ll just have to get the MAC address by looking at the details of your Ethernet connection. We’ll do this next because we will want to find out the currently assigned IP address.
From Cortana search, type network and sharing then select Network and Sharing Center.

Click on Change adapter settings.

Double click on your Ethernet connection.
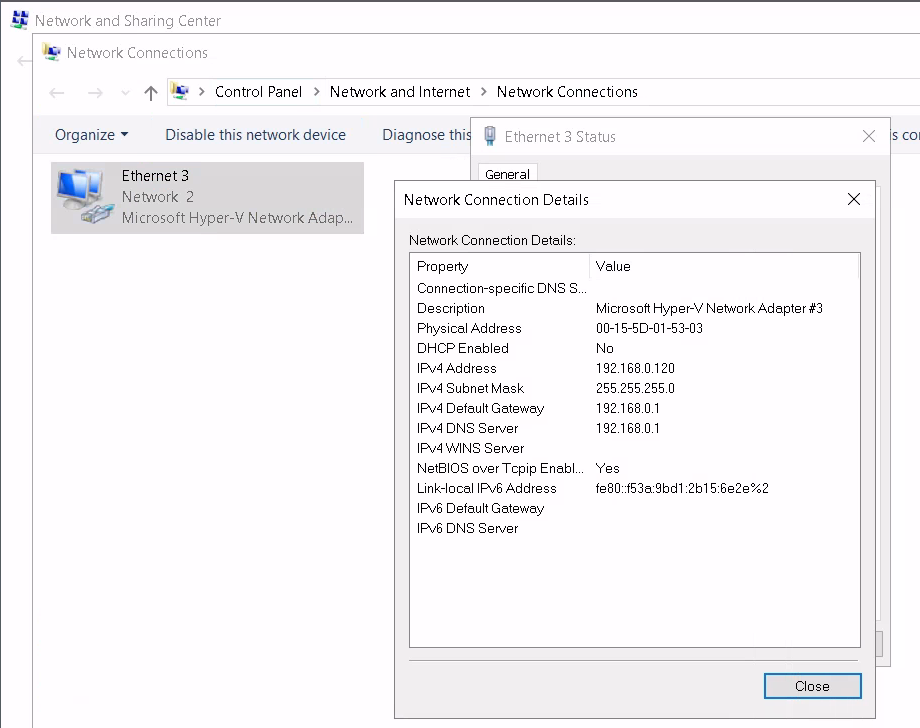
Take note of the current IPv4 Address. This is what we are going to set as our static IP address. We will want the computer to use this IP address every time the computer starts. Also take note of the IPv4 Subnet Mask, IPv4 Default Gateway, and IPv4 DNS Server.
If you are going to use MAC address reservation, you will want the “Physical Address” (what Microsoft Windows calls the MAC address).
Yes, I have already set the address in the screenshot as the static IP address. The “DHCP Enabled” option will say “Yes” instead of “No” if DHCP is enabled. DHCP is the service that reaches out to your router to acquire an IP address.
Once you have taken note of the current IP address, click on Close twice.
Right click on your Ethernet connection and select Properties.

Click on Internet Protocol Version 4 (TCP/IPv4) then select Properties.

The IPv4 Properties screen will load. Select Use the following IP address and Use the following DNS server addresses.
Enter the settings you took note of. You can leave the Alternate DNS server field blank. I leave it blank because the DNS server typically points to a secondary DNS server anyway (such as your Internet Service Provider’s DNS servers).
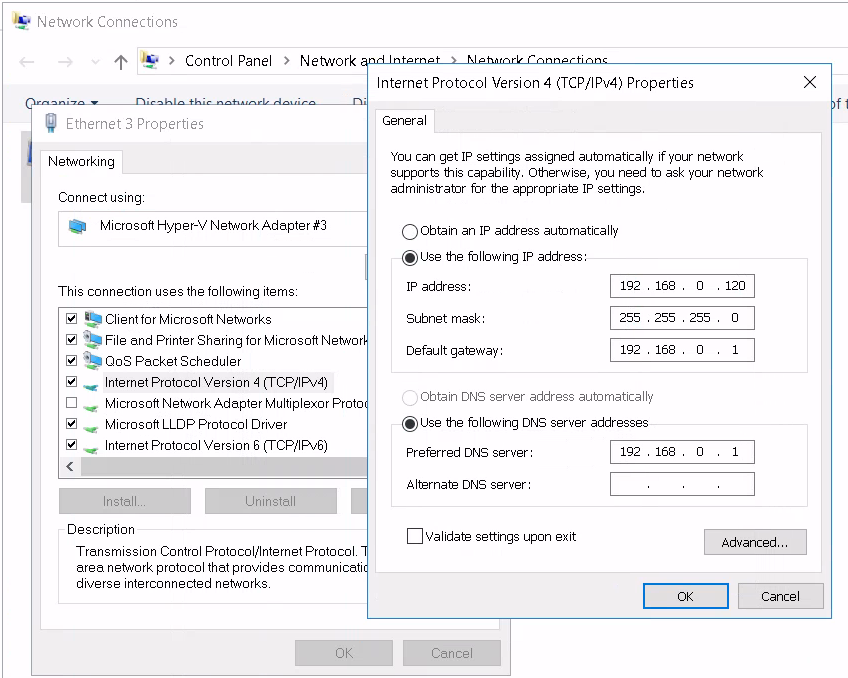
Click on OK twice to close.
Power Management
We are now going to change the power management options to prevent the computer and the hard drives from going into sleep or hibernation mode. The best way for us to do this is through the Group Policy Editor. Why? So the settings will be applied system wide.
Click on the Cortana search and search for gpedit.msc and click on the shortcut that appears under Best match.

Expand Computer Management > Administrative Templates > System then select Power Management.
Double click on Select an active power plan.

If not already, select Enabled then change the option to High Performance.
Next, click on the Hard Disk Settings folder. I recommend the following settings.
Double click on Turn Off the hard disk (plugged in). Select Enabled. I set the Turn Off the Hard Disk (seconds) number to an absurdly high number. Then when I tried to apply the change, Windows said the highest value possible is 4294967295 and it set it for me.
4294967295 seconds is 49710.26961806 days, per Google.
Unfortunately, editing this setting through Group Policy does not allow us to simply select Never.
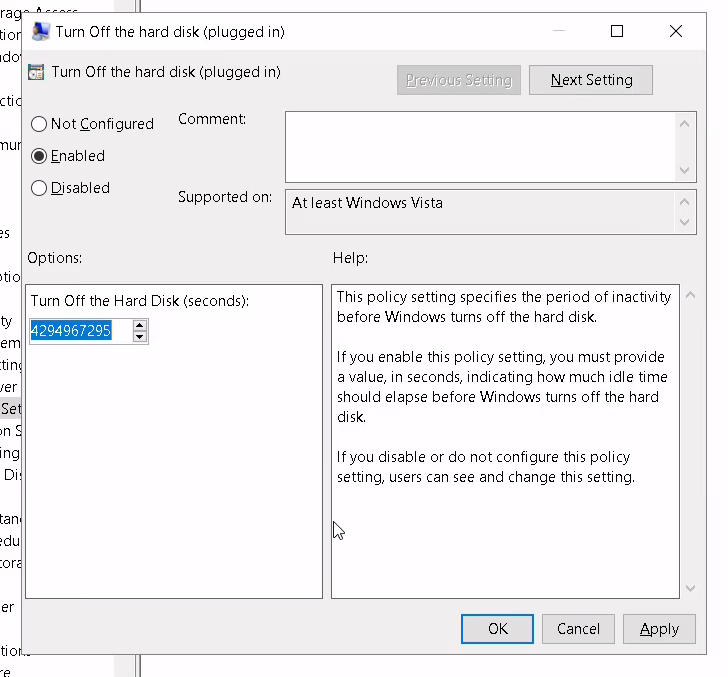
If you have the need, set a time (seconds) for the Turn Off the hard disk (on battery) setting.
Boost RDP Performance
Next, we will change settings that will help make the remote desktop experience better for the end user.
Disable Wallpaper
One of the quickest and easiest ways to boost the performance of an RDP session is to use a solid color as your background instead of a picture. It is kind of boring, but will save you some bandwidth.
Disable Visual Effects
The next best option for giving your RDP session a performance boost is disabling visual effects. There are a couple of ways to go about this. One for users who have admin privileges. The other for non-admin users. I feel like the way admin users can disable visual effects is the most effective, but not everyone should be an admin of a computer. You could change the user to an admin user, then back to a standard user once done. If you’re not able to at all, I have instructions that standard users can follow as well.
For admin users:
In Cortana search, search for System.
Click on the System option below the Settings section.
Click on Advanced Settings
Click on the Performance tab if it is not already selected. Click on Settings in the Performance section.
From the Visual Effects tab, select Adjust for best performance.
You may want to play around with the options in here so that you get the best performance and appearance ratio. I have discovered that re-enabling Smooth edges of screen fonts and Smooth-scroll list boxes is pretty safe and doesn’t hinder performance.
Click on OK.
For non-admin users:
In Cortana search, search for ease of access

Click on Ease of Access Center
Click on Use the computer without a display.

Select the option for Turn off all unnecessary animations (when possible).

While doing this for non-admins definitely helps performance, I don’t think it is as good as being able to disable ALL of the visual effects like you can through the Advanced Properties screen.
Increase Paging File
If you don’t have an SSD, you’ll want to ensure that your paging file has been set to the recommended size. Go back into the System properties.
In Cortana search, search for System.
Click on the System option below the Settings section.
Click on Advanced Settings
Click on the Performance tab if it is not already selected. Click on Settings in the Performance section.
Click on the Advanced tab.
Ensure that the setting for Adjust for best performance of option is set to Programs.
At the bottom of the screen in the Virtual memory section, click on the Change button.
Personally, on systems with a traditional HDD, I always like to manage the paging file myself. So I uncheck the Automatically manage paging file size for all drives option.
I then select Custom size.
I do then enter the recommended paging file size that is listed at the bottom.
Click on Set then OK to make the changes.

You will have to restart for the changes to take effect.
Use ReadyBoost
Another option for potentially increasing system performance is to utilize a feature called ReadyBoost. ReadyBoost offloads some of the cache to an external drive. If you have an SSD, this will not be beneficial to you, so Microsoft has disabled ReadyBoost in systems that have an SSD installed.
Insert a USB thumb drive that you do not intend to use. The larger and newer, the better.
If it’s not already, I recommend formatting the drive. You’ll want to format the drive with the NTFS file system.
Once the drive is formatted, right click on the drive in This PC and select Properties. Then click on the ReadyBoost tab.
Below is what you will see if ReadyBoost is not available on your computer. In my case, it is because I have an SSD.

Below is what you will see if you have a regular hard drive and ReadyBoost is available to be used.
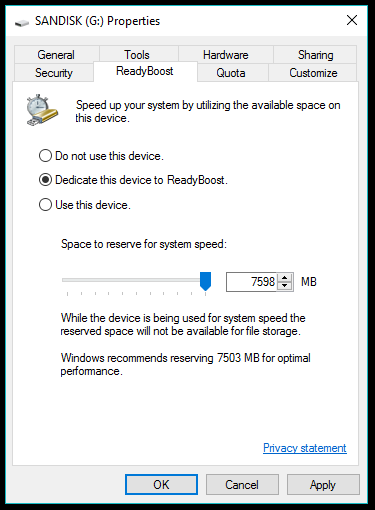
I recommend selecting the Dedicate this device to ReadyBoost option.
Your experience will vary. It’s going to depend on the input/output speed of your USB port and the speed of your flash drive. If it does help your computer, maybe add an additional flash drive. If it helps the performance, fill up the remaining USB ports on your computer and dedicate them to ReadyBoost. Just be aware that with the constant read/write to the USB drive, it may overheat and/or kill your flash drive.
Install RDP Wrapper
Finally, we need to install the piece of software that will allow multiple users the ability to connect into our server via RDP. That program is RDP Wrapper (or rdpwrap as it is called on github). If you’re a fan of Chocolatey (as I am), it’s available in their repositories. Otherwise, download a copy of the latest version of rdpwrap from github.

Once it has downloaded, you will need to extract the ZIP file.
Open the folder that contains the extracted files.
Run the install.bat file. You’ll have to allow it to make changes to the system. Once it installs (should be extremely quick) you’ll see this message.

Press any key to continue.
Run the RDPCheck application. This should look like a remote desktop login screen for your computer. If you see your computer’s login screen, you will know that it is working.
As I mentioned earlier, unfortunately, this does not work if you have a Hyper-V host with RemoteFX enabled.
If it didn’t work, check the FAQs on the RDPWrap page of GitHub.
We are now ready to move on to setting up the thin client.
Thin Client Setup
The instructions that I am going to provide to you for setting up your Raspberry Pi pick up where the Secure Baseline Setup Image post ended. Some of the things you will need to ensure that you do with your newly flashed microSD card are:
- Change the hostname.
- Perhaps something like one of the following:
- “rpi-tc-kitchen” (device type – purpose – location)
- “thinclient” (if you’re just planning on deploying one)
- “kitchen” (simply the location)
- Perhaps something like one of the following:
- Set a static IP address.
- Adjust memory split.
- In this instance we are going to need more RAM to the GPU because we are going to be using a graphical user interface. As I mentioned earlier in this post, I am using a Raspberry Pi 3 for this project. Which has 1 GB of RAM. So I am splitting the RAM down the middle. 512 MB for RAM and 512 MB for the GPU.
- If you are using a Raspberry Pi Zero or Zero W, both only have 512 MB of RAM, I would only recommend dedicating a maximum of 128 MB to the GPU.
- Add a new user.
- When you are adding a new user, keep the following in mind:
- Do I want the thin client to automatically logon, connect to the remote system, and automatically logon to the remote system?
- This would be idea for a kiosk type of computer.
- A username such as “rpi-tc-kitchen-user” may be overkill, even though I kind of like it. “rpi-tc-user” is a good option, in my opinion.
- Do I want the thin client to prompt for credentials, connect to the remote system, and automatically logon to the remote system?
- In this case the Pi would startup and prompt the user to logon to the Pi. Then after successfully logging onto the Pi, it would automatically connect into the remote system and log the user onto the remote system.
- I would say use standard username credentials: first.last, firstname, lastname, initial followed by the first or last name. Examples: jane.doe, jane, doe, jdoe, or doej.
- Do I want the thin client to boot up, prompt for credentials, but then display a logon screen for the remote system?
- In this case the Pi would startup and prompt the user to logon to the Pi. Then after successfully logging onto the Pi, it would connect to the remote system, but only display a logon screen.
- The only problem with this option is the default timeout. Windows will disconnect a user who does not promptly logon to an RDP session.
- Again, I would say use standard username credentials: first.last, firstname, lastname, initial followed by the first or last name. Examples: jane.doe, jane, doe, jdoe or doej
- I will show you how to setup the thin client using all three of the scenarios above.
- I still recommend setting up two-factor authentication for any new account that you create. Why? Especially if you are going to have the Pi automatically logging a user on? Think about an attacker from the outside. We would still want to prevent them from gaining access remotely.
- Do I want the thin client to automatically logon, connect to the remote system, and automatically logon to the remote system?
- When you are adding a new user, keep the following in mind:
If you are not sure how to perform the tasks above, you will want to refer back to the Raspbian Stretch Lite Secure Baseline Setup article. In that article I have instructions for changing the hostname, setting a static IP address, adjusting the memory split, adding a new user, and setting up two-factor authentication.
Building a Desktop Environment
Up until this point we have been using the Raspberry Pi via command line. In order for us to use the Raspberry Pi as a thin client with a graphical user interface, we need to install a few components. We could get extremely fancy with this, but we’re not going to. We could install panels/docks for launching applications, desktop icons, various widgets, etc., but we’re not going to. All we want is for when the user or system logs in, the RDP session launches, and the user doesn’t even know there is a desktop running behind that RDP session.
If you’re wondering, why not just use the desktop version of Raspbian? We could. You’re absolutely right. However, while that desktop environment has been optimized to run extremely well on the Raspberry Pi, it still uses processing power that I would rather make available to the RDP session.
Install Xorg Display Server & lightdm Login Manager
We will start by installing the Xorg Display Server and lightdm Login Manager. Xorg will get us an extremely basic GUI to start building our barebones desktop environment from. Lightdm will give us our login manager.
Reboot.
Install openbox
Next, we are going to install openbox.
Openbox is an extremely basic window manager. A window manager adds the titlebar, close/minimize/maximize buttons, shadows, colors, etc., to any applications that are being presented on the desktop.
Reboot. Login. Right click and launch a terminal (or login via SSH).
Install xfreerdp
xFreeRDP is the RDP client that we are going to use to connect into our server.
There are a ton of options that can be specified when using xfreerdp to connect to an RDP server. If you’re interested in learning about all of the options, I recommend looking at either the man page (from a terminal window enter man xfreerdp) or refer to an online version.
Just to test the connection, we’ll use the following command:
xfreerdp is the name of the program.
/f will force the connection to fullscreen mode.
/u:USERNAME (replace USERNAME with your username).
/p:”PASSWORD” (replace PASSWORD with your user’s password). Leave the quotes.
/v:IPADDRESS (replace IPADDRESS with your server’s IP address) specifes the server we want to connect to.
/port:3389 – Port 3389 is the standard port for RDP.
Once you have confirmed a successful connection we will proceed. If the connection was not successful, review any error messages in the thin client command line or on the server’s event logs.
Configure Your User
I mentioned at the beginning of this section that you should start to think about how you want to configure the authentication of users to your thin client and to the RDP server. There are many more scenarios, but I presented three to you.
I could tell you how to do each one of those separately, but if I did, there would be tons of duplication. Instead, I’m going to give you the instructions that you will need to achieve one of those options.
Option 1: Open Kiosk
In this mode: The Raspberry Pi Thin Client (RPITC) will bootup, automatically logon, and automatically logon to the RDP server.
You’ll need to follow these sections:
User Auto Logon
Create Thin Desk Desktop Environment
Option 2: Single Authentication Terminal
In this mode: The RPITC will bootup; The user will have to logon to the thin client; Once logged onto the thin client they will be automatically connected and logged onto the RDP server.
Skip to the Create Thin Desk Desktop Environment section.
Option 3: Double Authentication Terminal
In this mode: The RPITC will bootup; The user will have to authenticate to the thin client; Once authenticated to the thin client the user will have to also authenticate to the RDP server.
Skip to the Create Thin Desk Desktop Environment section.
User Auto Logon
To setup a user to be automatically logged into the thin client, we will need to make some changes to the lightdm configuration file.
Use Ctrl + W to search for #autologin-user
Put a new line below #autologin-user = User to log in with by default (overrides autologin-guest)
Enter the following on the new line:
autologin-user = YOURTCUSER
Replace YOURTCUSER with the user account you created for auto logon.
It’s just a few lines below, but if you need to, use Ctrl + W to search for #autologin-user-timeout
Put a new line below #autologin-user-timeout = Number of seconds to wait before loading default user
Enter the following on the new line:
autologin-user-timeout = 0
Yes, of course, you could uncomment the #autologin-user and #autologin-user-timeout lines and put your user and timeout setting after the =, but I prefer to leave the original there. I have changed a config file and still been able to get whatever I was trying to do working. Occasionally, I will go back into the config file and realize I left out something or added one too many of something. It’s just nice to have the original there as a reference.
Create Thin Desk Desktop Environment
Now we need to create the actual file that defines our desktop environment. We’ll call this environment “Thin Desktop.” This file is basically a script that will launch our RDP connection and openbox in the background.
Add the following lines to the file.
#!/bin/sh

xfreerdp -fonts -menu-anims -aero +bitmap-cache /rfx /rfx-mode:video -wallpaper -themes /f /u:USERNAME /p:PASSWORD /v:IPADDRESS /port:3389

openbox
Note that I have highlighted the second line because this is where you will decide if you want an (1) Open Kiosk, a (2) Single Authentication Terminal, or (3) a Double Authentication Terminal.
- Option 1 & 2: Enter the command as described above. Replacing USERNAME, PASSWORD, and IPADDRESS (leaving quotes around the username and password).
- Option 3: Strip out -u “USERNAME” -p “PASSWORD”
We are launching openbox last because the RDP connection doesn’t seem to work properly if it is launched last.
Save and exit the file.
Now we need to go back into the lightdm.conf file and specify that this thindesk file that you just created should be used as the default session.
Use Ctrl + W to search for #user-session=default
Make a new line below and enter the following:
user-session=thindesk
Save and exit the file.
Reboot the Pi.
Deploy
At this point your Raspberry Pi Thin Client should be ready to be deployed.